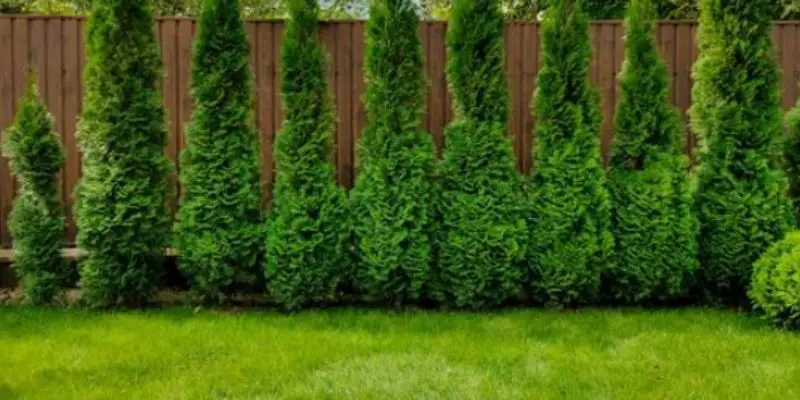
Hedges are carefully planted rows of shrubs or bushes that create natural boundaries, barriers, or decorative landscaping elements. Maintaining hedges through regular trimming and pruning is crucial for keeping them healthy, aesthetically pleasing, and serving their intended purpose effectively.
Proper hedge maintenance involves periodically trimming overgrown hedges and shaping the hedges to encourage thick, uniform growth. This prevents unsightly gaps, maintains the desired height and width, and allows air and sunlight to properly circulate.
Without routine upkeep, hedges can quickly become unkempt eyesores that undermine your home’s curb appeal. Overgrown, untamed hedges also become more susceptible to disease, insect damage, and long-term decline from lack of nutrients and light exposure.
Table of Contents
ToggleOverview of Common Overgrown Hedge Issues
When hedges go too long without being trimmed and pruned, a number of issues start to arise. Unchecked growth causes hedges to become excessively thick and wide, overtaking more space than intended. Wayward branches will begin jutting out haphazardly in all directions, creating an unruly, disheveled appearance.
As the outer foliage grows inward over time, the hedge’s interior becomes increasingly dense and dark. This shaded area can develop bare or dead internal branches from insufficient light. Lack of air circulation also raises risks of fungal diseases taking hold within the overgrown tangle of stems.
Severely overgrown hedges rapidly lose their defined edges and purposeful shaping. They become unsightly thickets that obstruct views, block pathways, and overwhelm the intended landscaping design. Ultimately, leaving hedges to grow wildly prevents them from serving as the impactful yet refined accent pieces they should be.
Assessing the State of Overgrown Hedges
Identifying Signs of Overgrowth:
Before attempting to tackle an overgrown hedge situation, you first need to accurately assess its condition. Closely inspect the hedge’s outward appearance for growth that has clearly extended past its intended boundaries and shape.
Obvious signs of overgrowth include branches protruding outward beyond the hedges’ desired width, and excessive vertical growth visibly higher than the intended height. Irregularly shaped outlines and gaps in foliage coverage are other red flags that trimming is needed.
You’ll also want to look for suckers – new stem growth emerging from the hedge’s base and lower areas. These should be removed, as they contribute to dense thickets at ground level if left unchecked.
Understanding the Impact of Neglect on Hedge Health:
While an overgrown hedge’s outward appearance provides clues of needed maintenance, there are also problematic impacts occurring within if it has gone too long unattended. Lack of adequate trimming and thinning allows dense overcrowding and shading.
As the hedge’s interior becomes more packed with overlapping branches and foliage, vital air flow is severely restricted. This stagnant environment is prone to harboring fungal diseases like powdery mildew that thrive in dampness and humidity.
Insufficient light penetration into the hedge’s core means branches get deprived of the sunlight needed for photosynthesis. This causes unhealthy inward dieback as stems become sparse and bare inside the thicket. The dense outer shell also makes pest infestations harder to spot at earlier stages.
Over time, the accumulated effects of overgrowth lead to plants becoming malnourished, stressed, and vulnerable to decline or death if left uncorrected. What may appear superficially as just an unruly mess actually indicates much deeper issues developing beneath the surface.
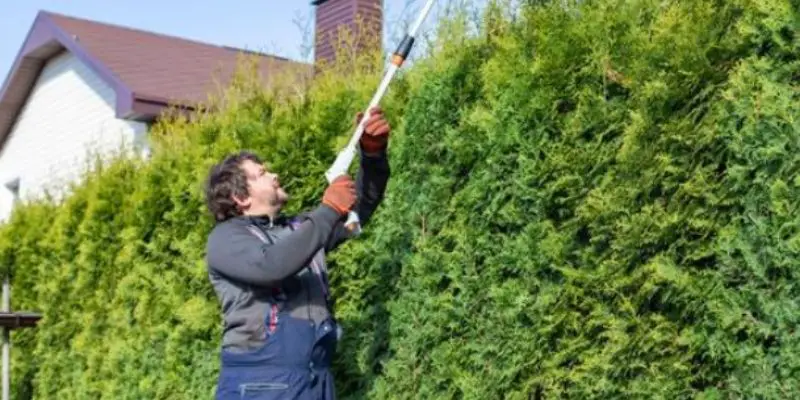
Essential Trimming Tools and Safety Gear for Trimming Overgrown Hedges
Hedge Trimmers: Types & Considerations
Having the right tools is essential for effectively trimming overgrown hedges. Quality hedge trimmers designed for the job will make the work much easier and give you better results. Options include:
- Manual Hand Pruners – For smaller, lightly overgrown hedges, basic bypass pruning shears can work in a pinch. Their shorter blades limit their efficiency, however.
- Electric Hedge Trimmers – These lightweight, cordless models are great for medium hedges. They’re easy to maneuver but have limited blade lengths around 18-24 inches.
- Gas Hedge Trimmers – Powered by a 2-cycle gas engine, these heavy-duty trimmers use longer 24-30 inch blades ideal for big overgrown hedges. They’re powerful but louder and require more maintenance.
Blade Types – Single-sided straight blades are most common. Double-sided dual-action blades can double cutting efficiency. Wavy or serrated blades may grab stems better.
Whatever model you use, prioritize trimmers with sturdy build quality, a full-wrap front handle for control, and a powerful motor that won’t bog down in thick growth. The longer the blade, the fewer passes needed.
Safety Gear for Hedge Maintenance:
Trimming hedges can kick up a lot of debris, so you’ll want protective safety gear to prevent injury. Essential items include:
- Eyewear – Wraparound safety glasses or goggles shield your eyes from flying twigs, leaves, or wood chips
- Gloves – Thick, sturdy work gloves protect hands from scratches, cuts, and blisters
- Long Sleeves/Pants – Covering exposed skin prevents painful scrapes from thorns and branches
- Closed-Toe Shoes – Sturdy boots or sneakers prevent foot injuries from falling debris
For extremely overgrown or thorny hedges, you may also want a protective jacket and hat. It’s smart to always wear ear plugs or muffs around noisy gas trimmers. Don’t take safety risks!
Pre-Trimming Hedge Preparation
Before you even unsheathe your hedge trimmers, take time to fully clear your work area of any debris, obstacles, or hazards. An unobstructed space around the hedges gives you safer access from all angles as you trim.
Start by using a broom or leaf blower to remove leaves, branches, and other debris that has collected around the base and perimeter of the overgrown hedges. Rake up any heavy accumulation of dropped debris trapped within the interior thickets as well.
Next, survey the area for any yard decor, landscaping rocks or boulders, patio furniture, play equipment or other lawn items situated too close to the hedges. Move these objects out of the way to give yourself ample clearance to maneuver without tripping or damaging anything. If the hedges partially block paths, make a plan for maintaining accessibility.
Finally, examine for lower overhanging branches on nearby trees that could hinder access. You may need to do some light tree pruning to gain headspace before starting your major hedge work down below.
Preparing the area fully allows you to move around and establish stable footing throughout your trimming efforts. It also prevents excessive debris buildup that invites pest problems and disease if left unaddressed.
Properly Pruning Trees Near Hedges to Allow for Sunlight
Like any plants, hedges need ample access to direct sunlight for healthy growth and vitality. Overhanging tree branches can create excessive shading that blocks the sun hedges require for proper photosynthesis.
Before trimming overgrown hedges, assess whether surrounding trees could be casting too much shade on the hedges from their upper canopies. Strategically prune offending branches to open up clearings for sunlight without over-thinning the trees.
Focus on removing any wayward, flexible branches drooping down over the hedge line. Using a pruning pole or ladder, cut these back to the main trunk scaffold branches as needed. Avoid over-trimming near the hedge, as falling debris can damage tender growth you’ll want to preserve.
The goal is to create overhead clearings directly above and alongside the hedges’ spans. At minimum, aim to provide 6 hours of direct sunlight exposure through selective pruning. Proper lighting will help revitalized hedges fill back in with lush, even growth.
Techniques for Trimming Overgrown Hedges
With your tools handy and the area prepped, you’re ready to start reclaiming those overgrown hedges. Follow this step-by-step guide to trim them back safely and effectively:
Step 1 – Remove Dead, Diseased, or Damaged Growth
First Begin by using bypass pruners or lopping shears to remove any dead, diseased, or severely damaged canes from the hedges. Cut them back to the base or a healthy offshoot. This instantly opens up the interior for more visibility.
Step 2 – Gradually Reshape from the Top Down
Next, take your hedge trimmers and work on leveling off the top of the hedge first. Slice off just the outermost layers of branches, gradually working down until you reach the desired height.
Step 3 – Work in Sections From Side-to-Side
Divide the hedge’s length into workable sections. Trim down the sides one section at a time using broad strokes, cutting branches back to the desired outer width. Proceed segment-by-segment sequentially.
Step 4 – Taper Sides Slightly Inward
As you work down each section, angle your trimmer blade inward very slightly as you descend. This tapered “A” shape maximizes sunlight penetration into the interior.
Step 5 – Periodically Check Appearance From All Angles
After every few sections, step back and critically examine the hedge’s overall shape, height, and symmetry from multiple vantage points. Make adjustments as needed to achieve uniform lines before proceeding.
Tips for Achieving a Uniform and Neat Hedge Appearance
In addition to the step-by-step trimming process, keep these tips in mind for crisp, tidy results:
- Use a Guideline – Tightly string a guide line at your desired hedge height to avoid straying too high or low
- Follow Natural Contours – Don’t try to force square edges or angles. Work with the hedge’s growth flow
- Freshen Interior – As you trim exterior branches, selectively prune out any rubbing or wayward inner stems
- Check Vertically Too – In addition to keeping tops and sides level, ensure flat vertical planes
- Avoid Cutting Into Old Wood – Keep cuts just outside the previous year’s growth knobs
With patient, attentive trimming, you’ll be able to restore overgrown hedges to a polished, manicured appearance that boosts curb appeal.
Tips for Trimming Different Types of Hedges
While fundamental trimming principles are similar across varieties, different hedge plant types may benefit from tailored techniques:
Boxwood – One of the most popular formal hedge choices, dense boxwoods respond best to frequent, light shearing/trimming to maintain crisp edges and geometric shapes. Hand pruning is ideal for interiors.
Privet – Fast-growing privet hedges require more frequent trimming to keep up. A rounded silhouette is most natural for privet. Be sure to open up interior to allow air flow and prevent dense overgrowth.
Laurel – With their large, coarse leaves, laurel hedges can look ratty if over-trimmed during active growth flushes. Let growth harden off first for cleaner cuts, and avoid shearing.
Holly – Prickly hollies make the densest hedges. Wear protection, follow growth nodes/buds, and layer interiors to permit light and air. Remove older canes annually.
Yew – For tidy geometric yew hedges, use precise shearing techniques and trim twice yearly. Don’t allow interiors to become excessively shaded.
Tailoring Techniques to Suit the Growth Pattern of Specific Hedge Species
Beyond plant variety, also be mindful of adapting your trimming and shaping methods based on the hedge’s specific growth habits, setting, and intended style:
- Formal Hedges – Used to define spaces or frame homes/gardens, formal hedges require very tidy, geometric shapes like squares and rectangles. Precise trimming is a must.
- Informal Hedges – More loosely clipped for natural privacy screening or windbreaks. Allow some asymmetry and gentle sculpting to curved lines.
- Tall Hedges – Use extended trimmer poles or rent lifts when over 6-8 ft. Tall to maintain even heights and sides safely.
- Short Hedges – Ground-level hedges may require crouching and sidetrims at oblique angles for visibility.
No matter the type or setting, do your research and adjust your trimming techniques as needed for the healthiest, best-shaped hedges possible.
Dealing with Thick and Overly Dense Hedges
Severely neglected hedges allowed to grow unchecked often become intolerably thick and dense with overlapping branches. When hedges have reached this “briar patch” state, more than basic trimming is needed – you’ll have to thin out the interiors first.
Use thinning techniques like hand pruning, removal pruning, and caning to open up the overly thick interior of excessively dense hedges before attempting to re-shape the exterior. This helps air and light penetrate deep into the center to revitalize the entire hedge from within.
Begin by using hand pruners or loppers to selectively remove older, thicker internal branches and canes near the base. Completely cut these out, making room for new growth. Be patient and break up stubborn knots of growth systematically over time if needed. Next, open up space between remaining branches by pruning out any rubbing, crossing, or inwardly facing limbs. Gradually develop distinct interior and outer layers.
For overgrown evergreen hedges, you may need to cane prune established plants hard all the way to 12-18 inches from the base to completely rejuvenate them. While extreme, this drastic thinning allows full regrowth from the lower trunk with proper spacing from the start.
Preventing Future Overgrowth
To ensure your newly thinned and trimmed hedges don’t become densely overgrown again too rapidly, maintain them properly going forward. Implement these prevention measures:
- Pruning Timing – Always prune hedges during their appropriate seasonal windows when growth is modest. Cool temps minimize foliar damage.
- Renewal Pruning – Yearly, remove 1/4-1/3 of older interior canes or branches to open up growth for next year.
- Growth Shaping – As new shoots emerge each season, use trimming techniques to direct outward growth habit and space branches.
- Sizing – If a hedge still seems prone to outgrowing its boundaries, consider gradually reducing its dimensions over time through pruning.
With vigilant thinning and shaping as part of your routine maintenance, you can enjoy full yet moderated new growth each season that retains the desired density without becoming overgrown.
Handling Hedges in Tight Spaces
1. Trimming Overgrown Hedges Along Fences and Boundaries
Overgrown hedges planted directly alongside fences, walls, or property lines always pose logistical challenges. You’re working with limited clearance space on at least one side, making access and visibility difficult for proper trimming.
If your hedge is planted flush against or straddling a boundary line, you’ll likely need to trim partially from the “other” side to maintain tidy edges. Be a good neighbor and kindly notify any adjoined property owners first.
You may also need to consult local municipal codes and property line laws. These often dictate how much you can legally trim overhanging growth back from fences and common boundaries without encroaching or creating disputes.
For tidiness, place temporary protective sheeting or boards over and along any fence lines you’ll be trimming against. This catches debris and prevents inadvertent scraping. You can also run guide strings on both sides to keep nice straight edges.
7 Best Top Rated Electric Hedge Trimmers – A Detailed Buying Guide
Techniques for Trimming Overgrown Hedges Near Structures and Buildings
Overgrown hedges surrounding built structures like your home, outbuildings, or decks pose another set of obstacles. Limited clearance means extra care must be taken to avoid accidental damage.
Consider using smaller, more maneuverable curved hedge trimmers or electric hand pruners in these confined spaces. Compact tools give you better precision and visibility when trimming right along walls and foundations.
For hedges grown up against buildings, use pieces of plywood or tarps to shield areas like windows, trim, and siding as you work around them. Watch your swing arcs carefully to avoid impacts, and don’t attempt to reach too far. Be patient and work meticulously bit by bit instead of rushing.
Post-Trimming Maintenance and Care
1. Clearing Trimmed Foliage and Cleaning Up the Area
Once you’ve got those overgrown hedges neatly trimmed back, you’ll need to complete the job by thoroughly cleaning up all the trimmings and fallen debris left behind. Leaving piles of leaves and branches scattered not only looks unsightly, but can smother grass and plantings underneath if left too long.
Carefully rake up all the dropped foliage, working row by row to clear it completely away from around the hedges’ base and perimeter. Use leaf scoops or tarpaulin sheets to collect it all as you go for easier disposal.
Next, be sure to clean out any branches, stems, or leaf litter that has accumulated within the interior of the hedge itself during the trimming process. A strong blast from a leaf blower helps dislodge and clear away debris embedded deep inside.
Once you’ve gathered all the trimmings and organic matter, you can choose to bag it up for yard waste collection, burn it (locally permitted), or better yet – shred the debris to use as nutrient-rich mulch around your freshly pruned hedges!
2. Fertilization and Watering Tips for Promoting Hedge Health
Major hedge trimming and pruning is quite stressful for the plants, as they expend a lot of energy regrowing lush, new foliage. Provide your hedges with a nutrient boost and deep watering after trimming to promote vigorous regrowth.
About 2-3 weeks after your pruning work, apply a granular fertilizer formulated for woody plants and shrubs around the base of the hedges. Be sure to follow product instructions carefully for amount and proper distribution.
You can also use compost, manure, or fertilizer stakes/spikes for slow nutrient release over time. Just take care not to overdo nitrogen, as that can potentially encourage too much lanky growth.
After fertilizing, give your hedges a deep, thorough soaking. Use a hose to slowly saturate the ground and drench the entire root zone of the hedges. This helps dissolve and carry the fertilizer nutrients down to the roots effectively.
Consistent moisture is also key as the hedges put out their new growth over the next few weeks. During dry spells, continue watering deeply every 5-7 days rather than light, frequent sprinklings.
By replenishing nutrients and hydration levels, you’ll give your newly trimmed hedges the resources they need to bounce back fully and put out an attractive, vigorous burst of new growth.
Troubleshooting Common Hedge Trimming Problems
1. Dealing with Disease or Pest Infestations During Trimming
As you methodically trim back all sides of an overgrown hedge, you may start noticing signs of disease or pest infestations that were previously hidden within the thick growth. It’s critical to address these issues promptly and properly.
For fungal diseases like powdery mildew, black spot, or rust, you’ll need to carefully prune out and destroy all visibly affected areas of the hedge. Make clean pruning cuts at least 6 inches into healthy wood beyond the diseased portions.
Severe infections may require treating with an appropriate fungicidal spray in addition to pruning out damage. Always consult your local nursery for the best fungicide to use on the specific disease and plant variety.
Insect infestations like aphids, whiteflies, mealybugs, or webworms can quickly take over hedges weakened from overgrowth. Prune away any heavily egg-cased nesting areas you find. Then treat remaining foliage with insecticidal soap, horticultural oil, or other designated insect sprays.
Maintaining good air flow through your pruned and thinned hedges will make them less vulnerable to diseases and pests going forward. But staying vigilant and acting decisively at first signs is crucial for preventing further spread.
Top 5 Best Black and Decker Cordless Hedge Trimmer Reviews
Addressing Uneven Growth and Patchy Areas in Hedges
Even after careful trimming, you may end up with some visibly patchy, uneven areas of bare spots or sparse branching on your hedges at first. This is an opportunity to address any underlying causes and get them corrected.
Bare spots are often caused by excessive shading from overgrowth, preventing those areas from receiving enough light for proper growth and causing dieback over time. With your trimming complete, those spots should eventually fill back in with new foliage growth.
Sparse, open branching with noticeable gaps can indicate larger issues like pest damage, disease, micronutrient deficiencies, or overly aggressive past pruning. Applying fertilizer and maintaining good cultural conditions should help renew density.
In extreme cases, when patchy areas fail to rebound with offseason growth, you may need to remove those sections of the hedge and replant new starter plants to re-establish evenness along the line.
Staying proactive about correcting growth issues is essential as no hedge looks tidy when it’s noticeably patchy and uneven.
Importance of Regular Maintenance to Prevent Overgrowth
Once you’ve put in the major work trimming your hedges back from an overgrown state, the only way to prevent them from becoming an unruly mess again is to maintain them consistently going forward.
Exactly how often you’ll need to prune and trim depends on the plant variety and desired formality of the hedges. As a general rule:
- Formal hedges require meticulous shearing every 6-8 weeks during active growing months to maintain crisp edges and shapes. Light pruning is also done yearly.
- Informal hedges used for privacy screens or windbreaks can go around 3 months between pruning sessions to just reduce height and width as needed.
- Most hedges benefit from comprehensive renewal pruning annually in late winter or earliest spring before growth flushes.
Mark your pruning schedule on a calendar and set reminders so you don’t let maintenance lapse! Consistent scheduled trimming is key to keeping hedges approved and under control.
Benefits of Regular Trimming for Hedge Health and Appearance
On top of keeping your landscaping looking crisp and stylish, maintaining a routine pruning and trimming schedule for your hedges provides some major plant health benefits:
- Improved structure and fullness by removing overcrowded, rubbing branches
- Maximum sun exposure and air circulation to prevent disease issues
- Clearing out old, unproductive branching encourages new healthy growth
- Plants maintain desired size instead of getting overgrown and unruly
- Renews natural tidy, uniform appearance that complements yard’s design
Sticking to your maintenance schedule is ultimately much easier than having to do major overgrown hedge renovations every few years. With regular minor trims, your hedges will always look their best!
Conclusion: Maintaining Beautiful and Healthy Hedges
Transforming an overgrown hedge from an unsightly thicket back into a tidy, attractive landscape element is totally achievable with the right knowledge and disciplined approach. Here’s a quick recap of the key points:
- Thoroughly assess signs of overgrowth and impacts like disease/pests first
- Assemble proper pruning tools and safety equipment for the job
- Prepare the area by removing obstacles and providing sun access
- Follow best practices for methodically trimming back top and sides
- Employ renovation techniques like thinning and caning for extreme cases
- Address issues preventatively through proper cleanup, feeding, and pest treatment
- Establish a consistent maintenance schedule going forward
With patience and attention to doing things properly, there’s no reason overgrown hedges should remain an eyesore around your home for long!
Take Ownership, Stay Committed
Trimming overgrown hedges does require an upfront investment of significant effort. But the long-term rewards of having lush, healthy, precisely trimmed boundaries make it all worthwhile.
Don’t resign yourself to just living with the tangled mess – take control and show those overgrown hedges who’s boss! With strong commitment to seeing the project through from beginning to end, you’ll experience immense satisfaction from transforming an unappealing area into one you can take pride in.
Keeping your hedges consistently maintained on a regular pruning schedule prevents future overgrowth issues. Plus, each year they’ll only look better and more impactful as revitalized growth fills in thicker and lusher.
Put these hedge trimming and care techniques into practice starting now. In no time at all, your overgrown hedges will be a mere memory – replaced instead by picture-perfect boundaries you’ll be delighted to showcase!
Also read:
Best Electric Black & Decker Hedge Trimmer – Top 3 Corded Picks

Michael Glenn is a certified arborist and horticultural expert with over 15 years of experience in the landscape industry. His passion for plants and trees has led him to become a sought-after authority on pruning and trimming techniques. Glenn’s in-depth knowledge of proper pruning methods, timing, and tools has helped countless homeowners and professionals maintain healthy, aesthetically pleasing gardens and landscapes.
In addition to sharing his pruning expertise through practical tips, step-by-step guides, and expert advice, Glenn is also a respected author of pruning tool buying guides. His comprehensive reviews and comparisons ensure readers can make informed decisions when investing in quality loppers, pruning shears, saws, and other essential equipment. With a deep understanding of plant biology and sustainable practices, Glenn’s writing empowers audiences with the knowledge needed to properly care for green spaces.